
 1000 Series locksets are the best choice for limiting access to high-traffic, security-sensitive areas in commercial, institutional, and industrial buildings.
- Single Combination
- Completely Mechanical
- Key override models will accept most interchangeable cores
- Available in different finishes
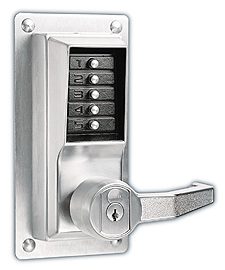
The L1000 Series locksets combine the features of the 1000 Series with ADA-compliant lever handles to provide accessibility for the disabled. This lock is ideal for high-frequency use in hospitals, entrances to commercial or industrial buildings, apartments, condominiums, washrooms, dormitories, and schools.
The LP1000 Series is designed to operate surface-mounted exit devices.
Changing the Combination
- Door to be in open position
- Key for inner cylinder (DF-59)
- Tools – spanner wrench supplied or flat blade screwdriver
- On models with passage feature (cylinder or thumb turn in center of inner plate), passage feature must be disengaged (locked mode)
- Choose a new combination and write it down. You can use one button or all five for a combination, but each button can only be used once. You can use two or more buttons simultaneously.
WARNING: Once procedure has been started, it must be completed, correctly, or “Lost Combination” may occur. Finding a lost combination requires complete disassembly of lock and combination chamber. This should only be done by an authorized professional service company.
1 Insert DF-59 key into cylinder located above the inner knob / lever (uppermost cylinder on passage models). Turn key counter-clockwise to unscrew plug assembly and remove from door. This will give you access to a change sleeve located inside the opening.
2 Fully turn the outside knob / lever to the stop position then release it.
3 Enter the existing combination (factory combination for newly installed locks is; press 2 and 4 simultaneously, release, then press 3) you should feel a click as each button is pressed. DO NOT TURN KNOB / LEVER
4 Insert the Tool (spanner wrench or flat blade screwdriver) into change sleeve (located inside the opening from which we removed the inside cylinder in step one). Gently turn the tool clockwise to the stop position (a slight click should be felt).
5 Turn the tool counter-clockwise back to a stop position and remove.
6 Fully turn outside knob / lever ONLY ONCE all the way to stop position. This clears existing combination.
7 Enter you new combination, press buttons carefully – a slight click should be felt as each button is depressed. (see requirements above for picking new combination)
8 Fully turn and hold outside knob / lever to stop position. While holding knob / lever check to make sure latch on side of door is retracted. Release knob / lever.
9 KEEPING THE DOOR OPEN, Test your new combination SEVERAL TIMES. Turn the outside knob / lever – latch should not retract. Press and release the correct buttons in the proper order, Turn knob / lever and latch should retract. release knob / lever and try again. DO NOT CLOSE DOOR IF UNIT DOES NOT SEEM TO BE WORKING PROPERLY.
If lock opens every time control knob / lever is turned WITHOUT entering any buttons, re-start procedure from STEP 5
10 Replace inner cylinder by inserting plug into opening and turning clockwise, screwing plug in completely – do not over tighten, key should be in vertical position to remove.